An important, time saving process of creating a technical drawing in the world of design and architecture is known as CAD, or Computer Aided Design technology. The creation of these precision drawings reduces the probability of human error, provide greater accuracy, and greatly shorten the design cycle.
From a napkin sketch to final product, a custom-designed furniture piece passes through multiple variances, tweaks, and adjustments. Throughout this process, AutoCAD software allows hospitality designers to document changes and keep the entire team up-to-date. However, this important line of communication can be delayed with unclear CAD drawings, resulting in redlines. To minimize redlines in furniture design, it’s essential to exchange CAD drawings that clearly demonstrate the design intent.With in-house CAD design, drawings, and 3D renderings with rotating model views, furniture manufacturers hold the custom manufacturing process to high standards. If any detail is in question, designers and engineers will reach out to confirm the intended results. Rather than delay production with phone tag and out-of-office email responses, the typical redline issues and simple oversights that arise can be minimized when it comes to preparing CAD drawings for custom furniture design.
Deliver Clear and Updated Plans
The number one way to minimize redlines in furniture design is to deliver clear and up-to-date CAD plans and files. To assure plans are legible, remedy fuzzy plots by increasing dpi resolution when converting from DWG to PDF. Projects should be consistently updated, which also applies to any and all specifications such as a discontinued commercial-grade upholstery or modified casegood finish. As changes become executed, furniture designers need to know current specs and substitutions.
 Make sure CAD images are clear by converting to PDF
Be Consistent and Use Correct Labels
On the topic of updated plans and specifications, be diligent and correctly label all hardware, product numbers, and finishes.
Product numbers need to be specified and adequately labeled on plans. This applies to casegoods such as nightstands, desks, and built-in vanities, where specified product numbers as well as correctly label knobs, pulls, faucets, and any fastened or mounted hardware are essential. Having hardware and lighting clearly marked makes packaging, scheduled deliveries, and furniture installation run more smoothly and on-time.
Furniture finishes and wood species need to be appropriately marked, including not only veneers and solid wood, but quartz and metals as well. Be certain to specify the grain direction of wood finishes and veneers.
In a competitive hotel market where ROI is crucial to success, specifications can drastically affect a hotel’s ROI. If not specified carefully for variables like climate and intended purpose, the finish can show wear and quickly appear outdated.
Specify wood species, finishes and hardware in notes
Be sure to label all cutout dimensions for wiring related to outlets or even sconce lighting installations in headboards or built-in vanities. These are very important to receive along with the spec package. Providing cut sheets help CAD engineers ensure that cutouts are correct and specifications are precise. It is wise to send along samples of lighting fixtures, sinks, faucets, and fastened hardware for further assurance.
The Advantages of Graphics
Graphics can provide visual cues to designers and make navigation much more manageable when editing plans. However, utilizing CAD standard layers and colors jointly must be properly executed.
While helpful to some degree, never solely rely on color codes when delivering plans. Color code layers often lose value when plotted in grayscale or photocopied, which is why ISO Standard line weights are the tried-and-true preferred method of computer-aided designs. The inverse is another common issue when printed drawings appear correct, but the CAD file itself is disorganized. Editing becomes a challenge with improperly set or unclear layers.
Cross-hatching is also a hand tool to distinguish multiple upholstery fabrics, wood species or casegood veneers.
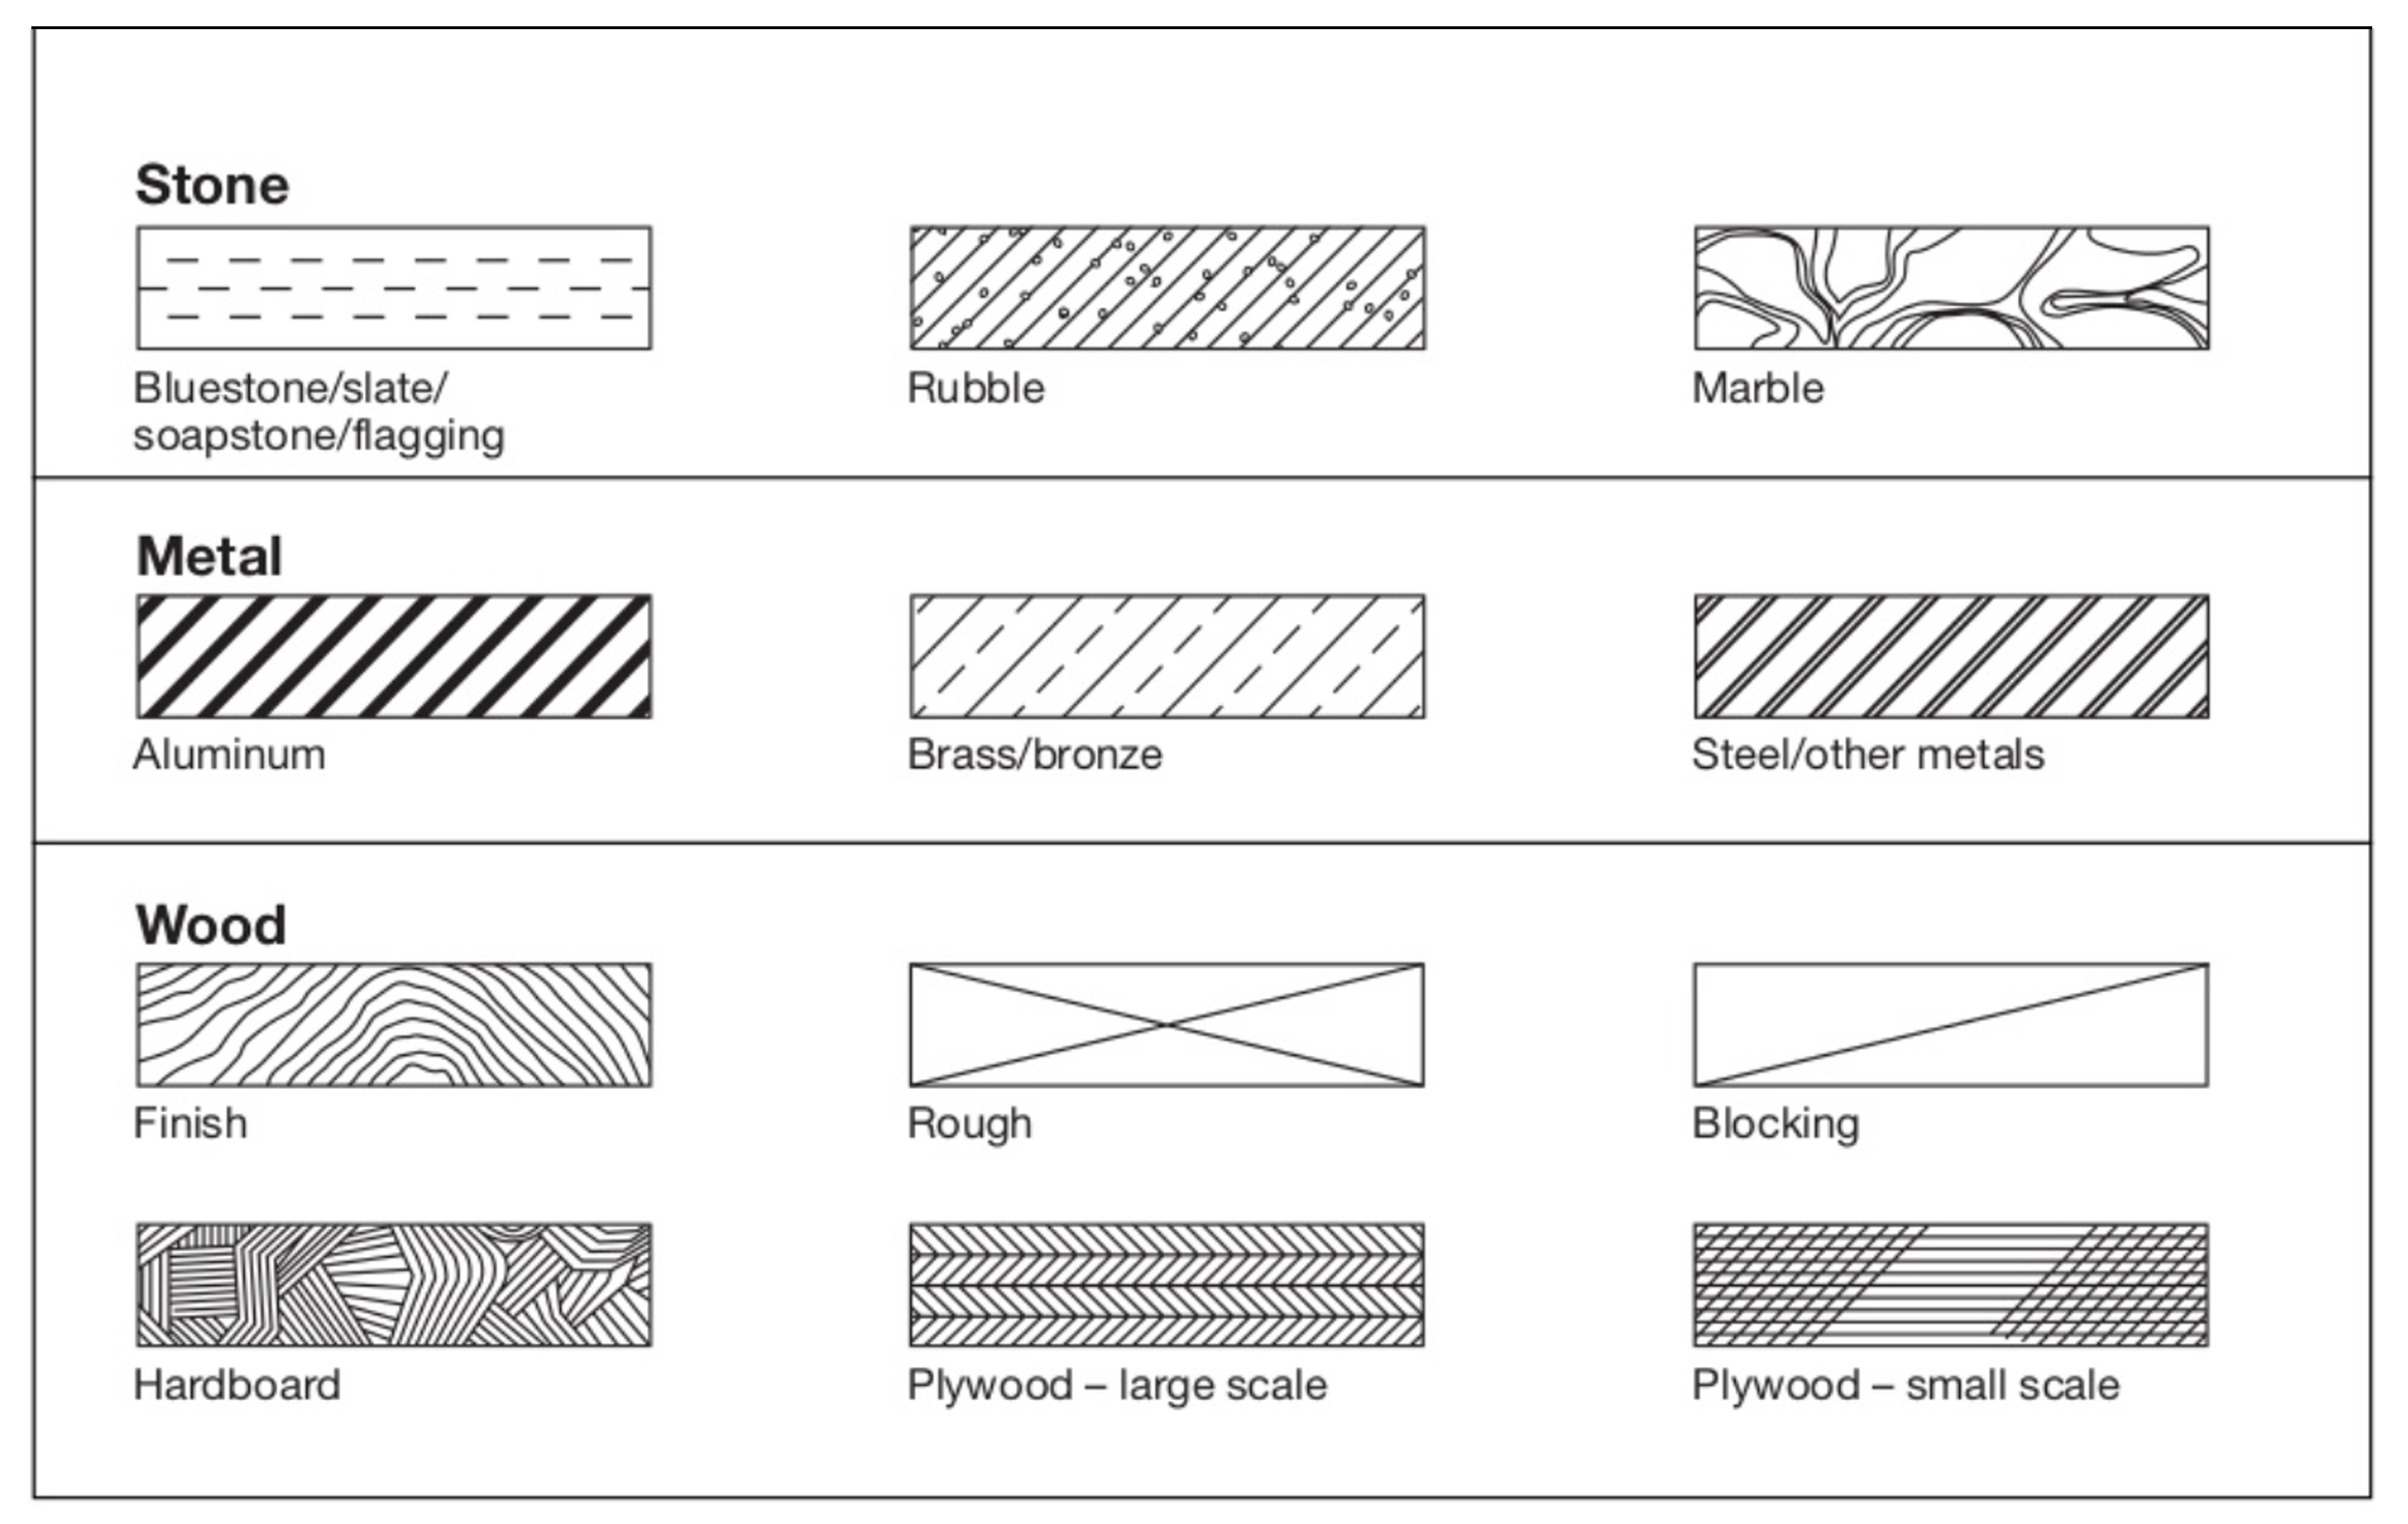
Use a legend to distinguish between cross hatch patterns
Importantly, for these graphic layers and labels, details are wasted without coordinating Notes and Legends. Abbreviations, cross-hatching, and line weights must be itemized, leaving nothing to question, even annotations.
Show Multiple Views
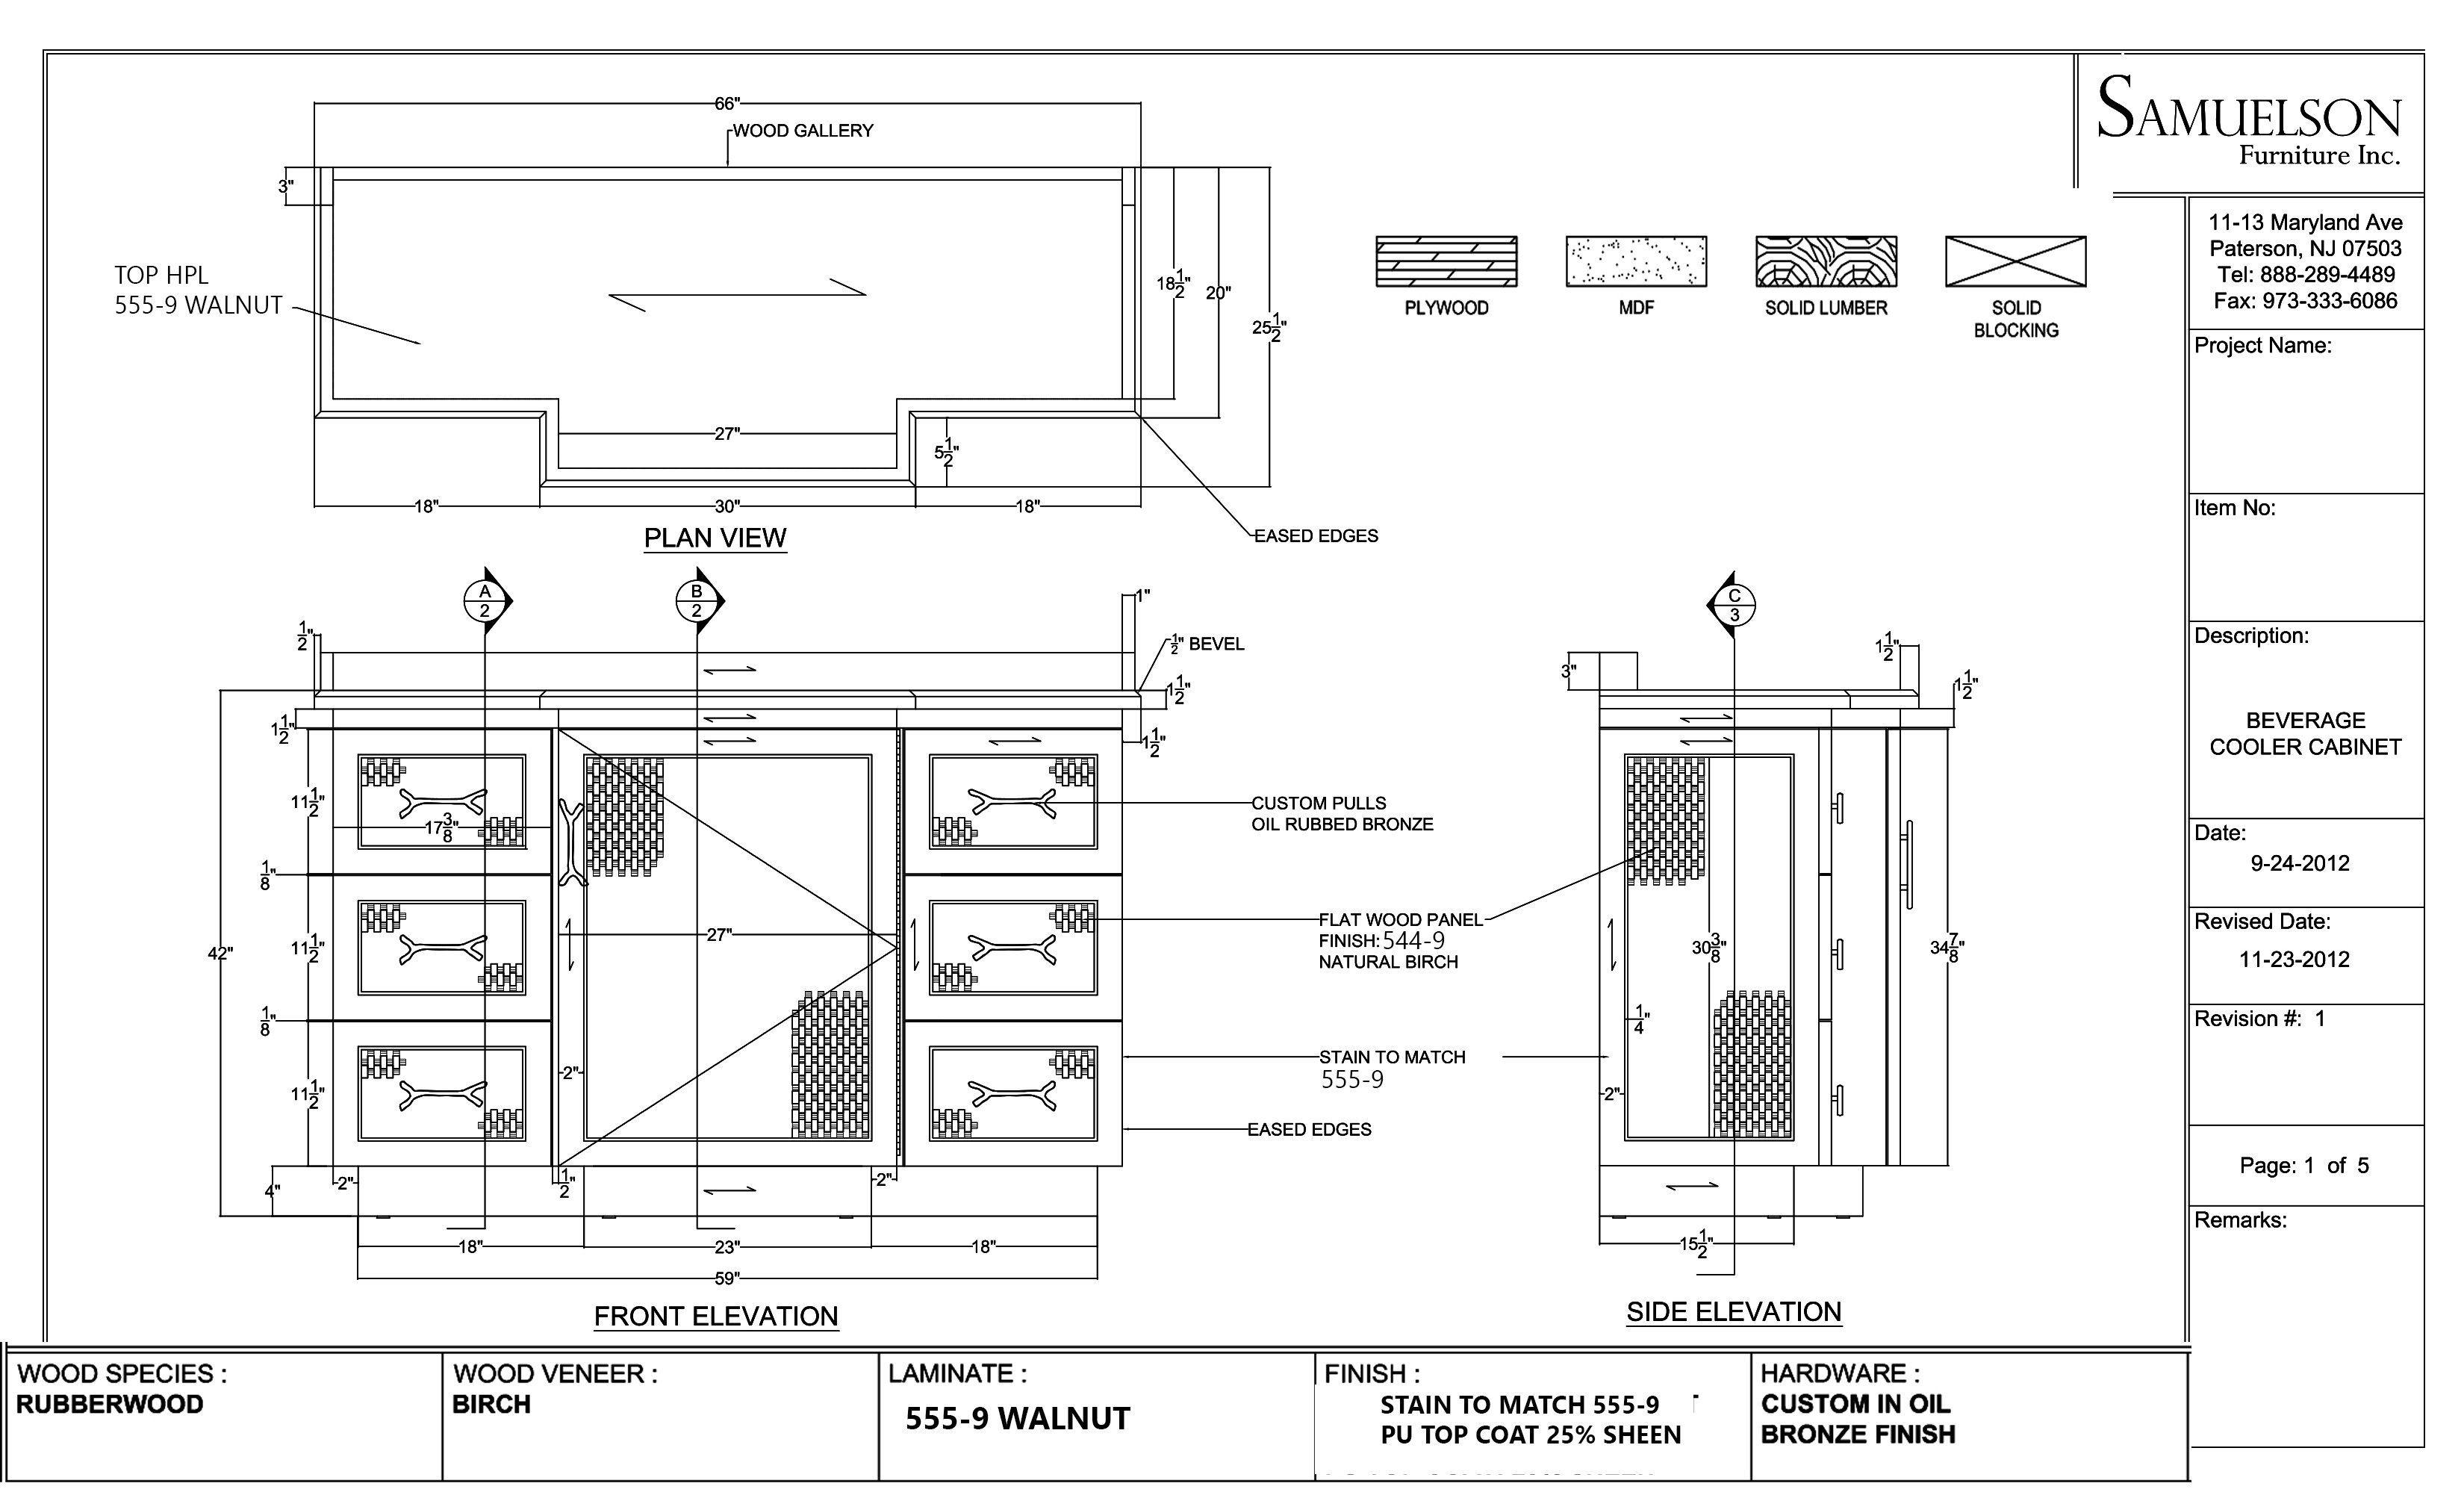
AutoCAD drawings with only 2D top views limit the furniture concept’s vision. For the full impact, it is essential to offer a variety of views.
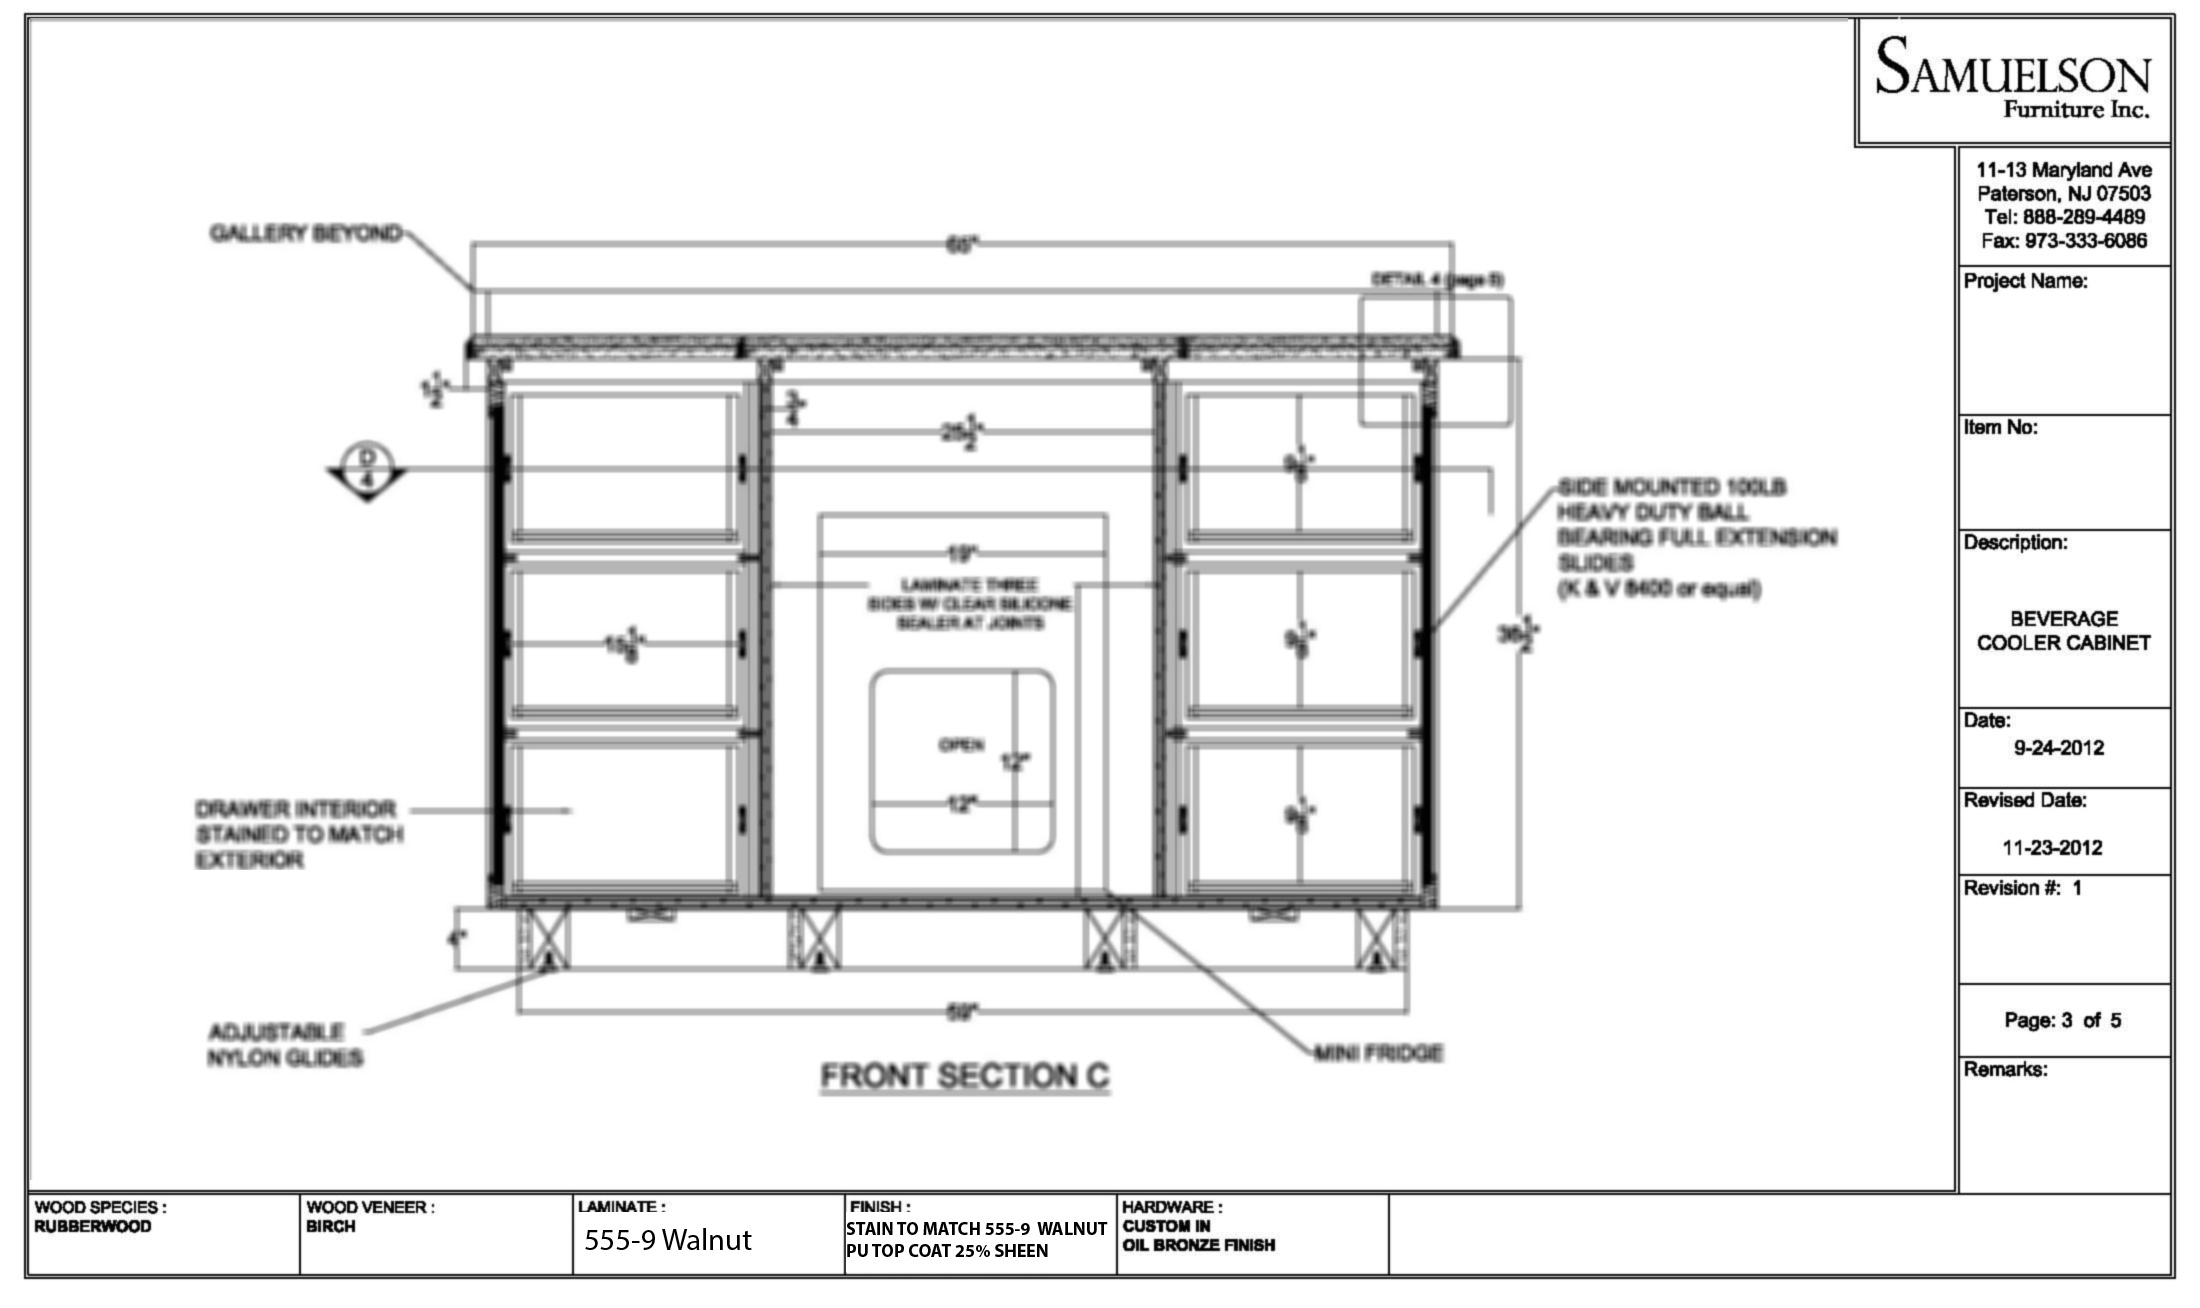
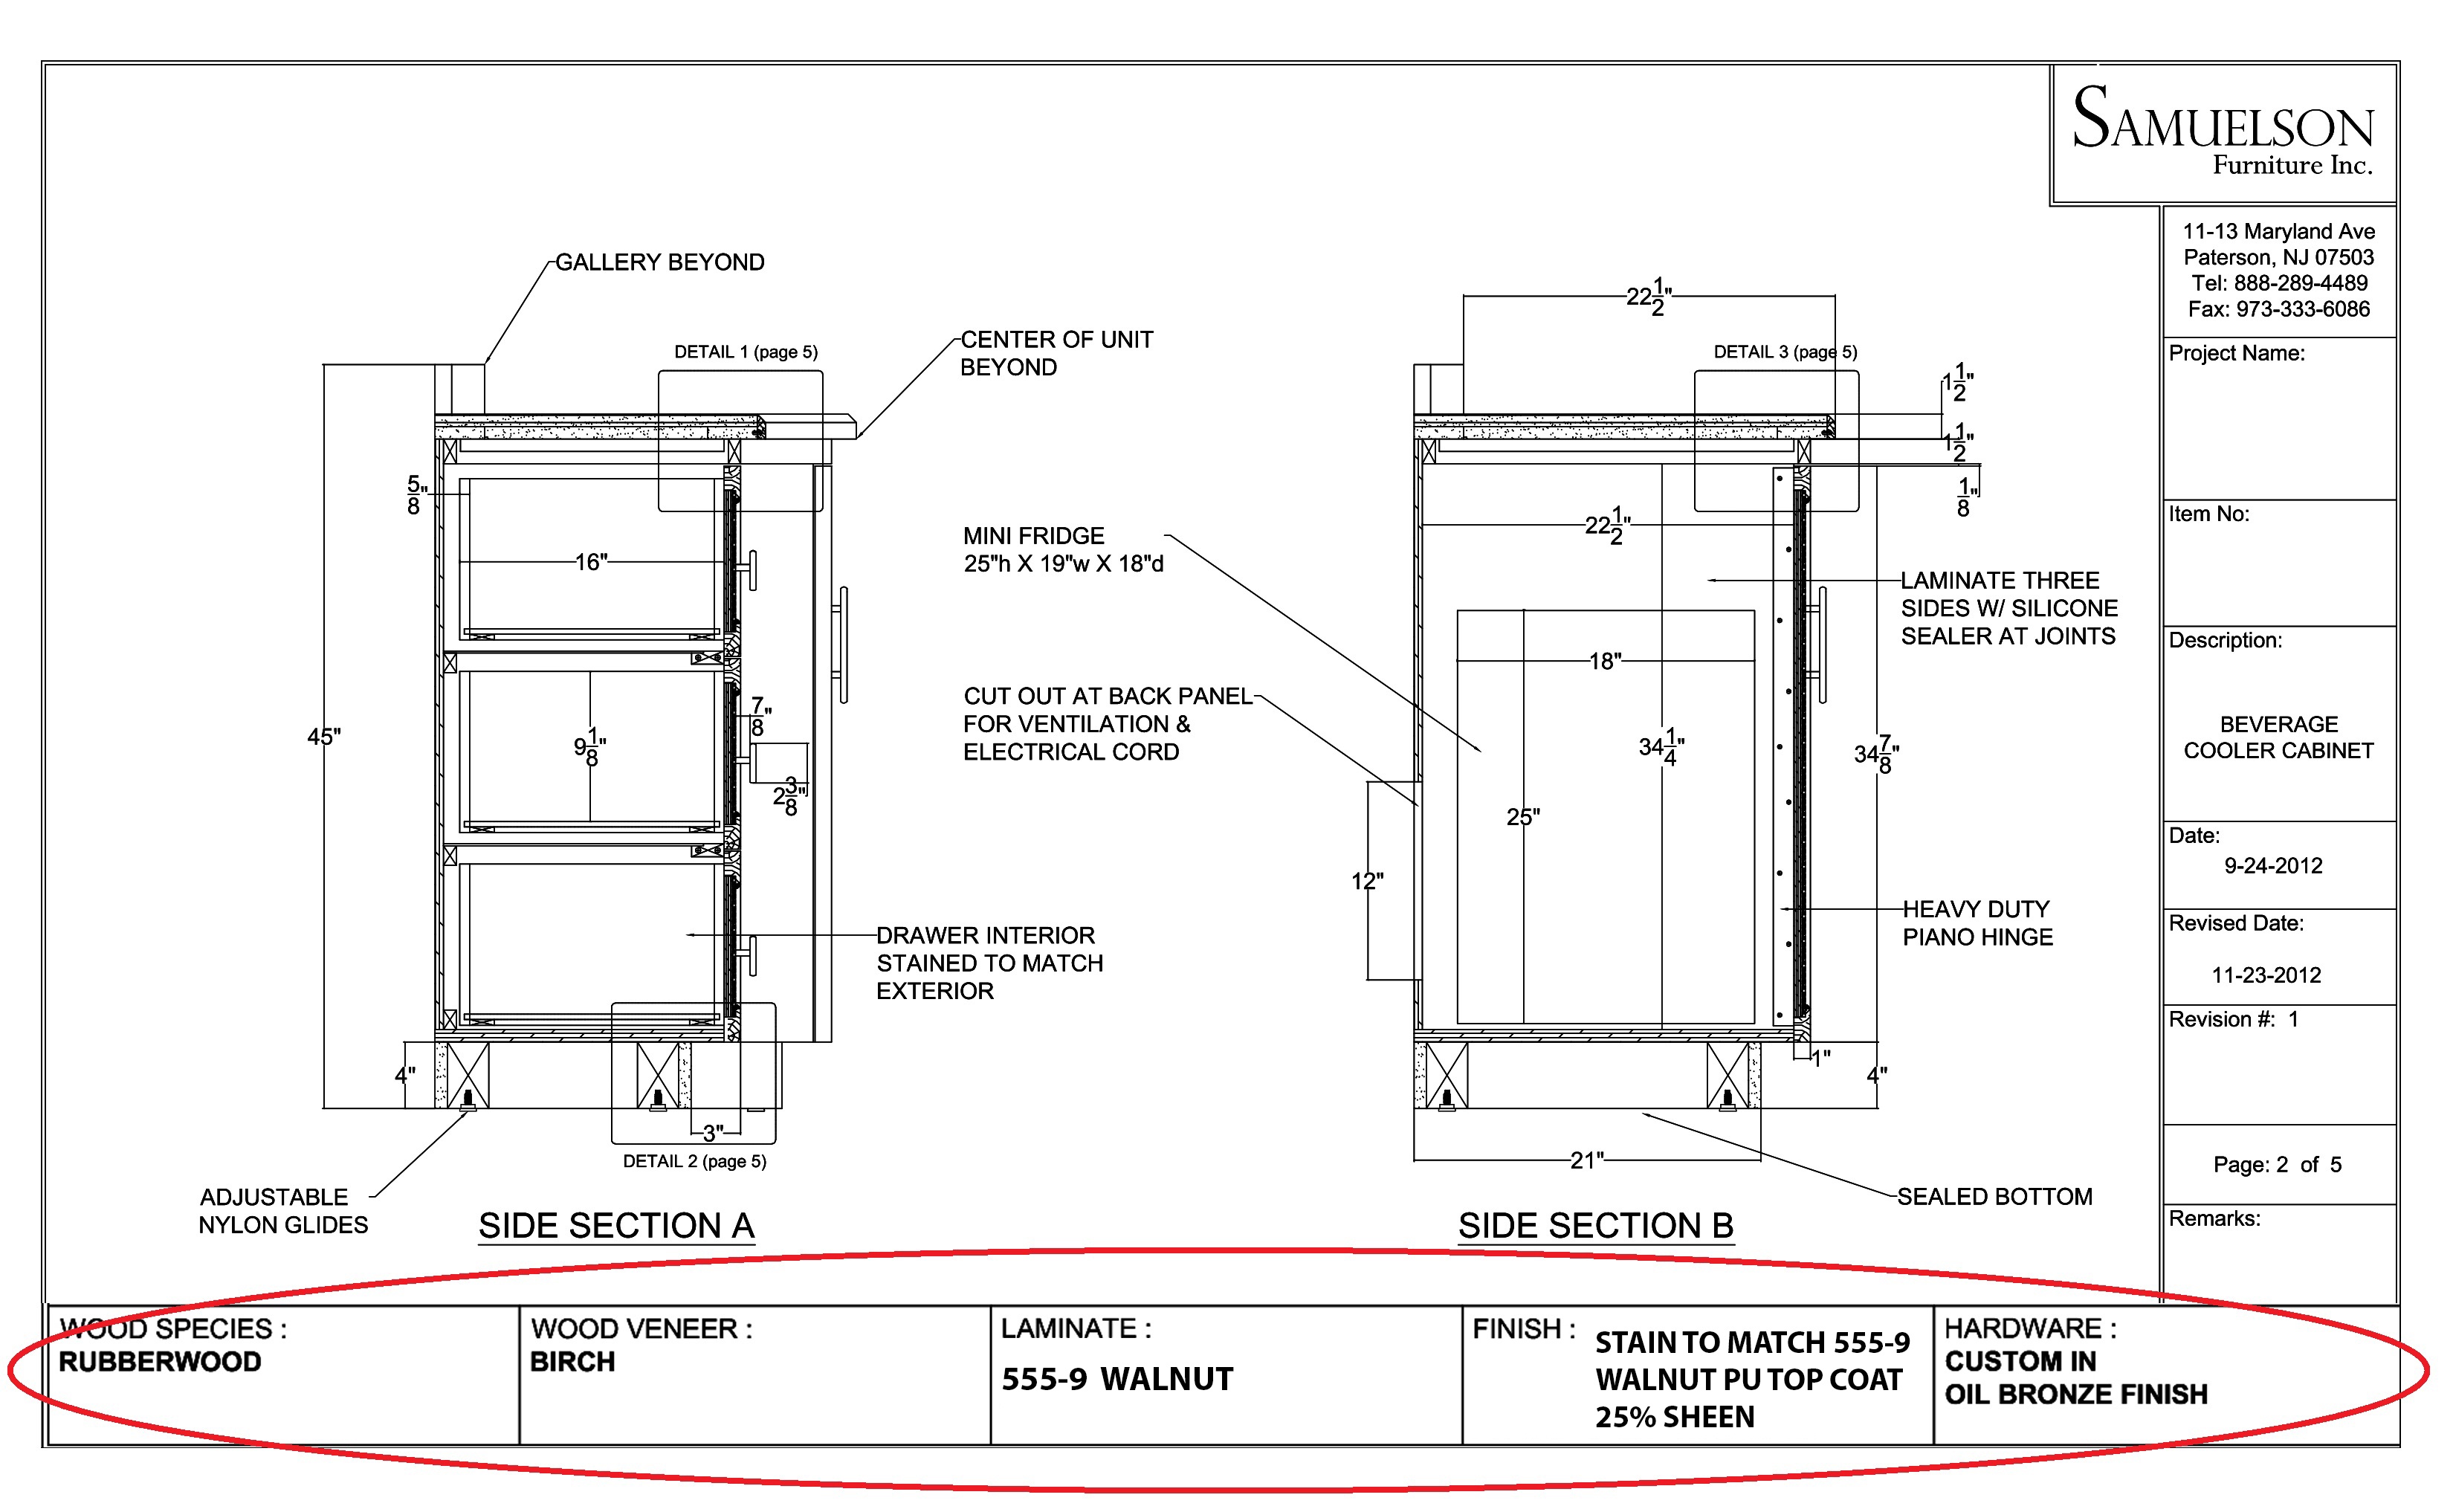
Side views and cross-sections offer more details than merely seat depth (which should already be in standard plans). These plan views provide designers information on upholstery construction, cutouts, and electrical data for built-in LED lighting. They also reiterate cutouts and specifications such as hardware products numbers and wood finishes.
Front views and elevations provide specific height dimensions. From a floor plan top view, it is impossible to anticipate if a banquette back was meant as 36 or 48 inches. Also, during installation, it’s important for the crew to know precise heights — Above Finished Floor (AFF), for instance. Installation crew also need to know the precise distance headboards should be mounted, allowing correct width for nightstands.
One common redline issues experienced in headboard and headboard accent wall panel construction is the lack of mattress specifications. While CAD drafters focus on specifying hardware, finishes, and all things physically attached, the mattress size is often overlooked, adding more time to the project.
 Show front and side views in CAD drawings to provide more details
Ideally, all of these mentioned views should indicate all the critical dimensions with complete accuracy. When designers receive a plan with an unmarked dimension, the only way to estimate is to manually scale PDF files, which is not only tedious and time-consuming but results in imprecise measurements. To avoid last-minute changes, designers need the correct overall dimensions of the furniture piece along with location dimensions for cut outs and hardware.
Minimizing Redlines Affects ROI
It’s crucial through each phase that interior designers, CAD drafters, engineers, and even the installation crew are all on the same page. Waiting for a follow-up call to confirm accurate dimensions before cutting or installation begins can delay the schedule. To guarantee timely delivery, every hour counts.


8642 Contemporary Cantilever base lounge chair- Designed with Streetsense
Communication amongst team members through accurate, detailed plans will positively impact budget and scheduling of hospitality projects, while avoiding costly, unexpected revisions.
To help minimize redlines in furniture design, please download this convenient fact sheet as a reference guide before submitting plans for your next hospitality project.

Have a great tip for CAD design? Comment below